Showing posts with label Chevron. Show all posts

5.17.2012

Furniture Retake: Coral and Mint Green Ombré Chairs

About a month ago I found these poor unfortunate chairs at my favorite local thrift store. They were having a 50% off tag sale and at $2.50 a pop I couldn't pass them up. 

This is what they looked like when I first got them home, x 2.


Sad, I know. 

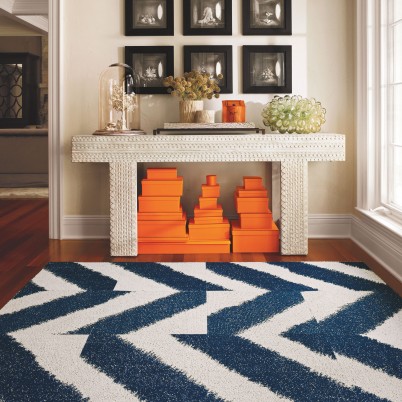
Whilst on Pinterest I came across this image:


I love the black and yellow combination! Cute, but when I received the yellow chevron fabric that I ordered here, not so much. womp womp.


So I scratched that.

 A walk around Jo-Ann's and I found this beaut, which got me thinking magical thoughts of mint green and coral.


 It went something like this:

via
 via


 via


BOOM!


And that's how these were born.


Mint green, coral AND OMBRÉ? Yep. I did it.


I know they aren't technically patio chairs, but I put outside fabric on the seats in case I felt they would better suit the patio. ( Which I do! )

If you want to know how I reupholstered the seats, keep scrolling as I posted that info in my last post.

So, will you try Ombré on your patio? I think it looks très cool.


M

5.16.2012

DIY Easy Reupholstering

When I was younger I would always watch my mother work on elaborate curtains, cushions, covers...you name it she made it. She was an Interior Decorator and a sassy one with her sewing machine and power tools. Perhaps the apple doesn't fall far from the tree. 

Well, anyway... She taught me how to easily reupholster a seat cushion for a chair back then and I thought I would share my recent experience.

Materials:

Staple Gun
Staples
Jigsaw
Plywood
Foam
Fabric
Pencil
Measuring Tape
Cat

What you do:

1. Take the cushion off of the chair. ha

2. Take the staples out of the back and remove the fabric. (If the foam is disgusting, remove that, too)

3. Determine if you need a new base. If so, take the wooden seat to Home Depot and they will cut you a piece to match it, or close. 

4. Trace the seat onto your newly cut wood then take a Jigsaw and cut the rest of the piece to match your seat. It's OK if it's not perfect. 
  Warning: BE CAREFUL WITH POWER TOOLS!


5. Trace and cut your foam to match the new seat bottom you just made. Let it be a little bigger than the base.

 Make sure you employ the cat to hold it steady, as he has to earn his keep.


  and let him double check he still fits. OK good. He does.

Do not cut foam while cat is checking. Tails move. But do threaten to eat him in a cat sandwich if he doesn't.


6. Lay out your fabric and place your wood and foam on it to eyeball where you want it to go. Remember to check your pattern and see if you like it if you have one.

*Mine was folded in half because I made 2.


6. Cut your fabric 2-3 inches passed the edge.


7. Staple the fabric to the wood. Don't use your thumb to pull it. Use the side of your hand so you don't get ripples. Leave the corners for last and grab them in a fist to staple. Hammer any staples that need help at the end.


Ta-Dah! Brand spankin' new seat cushions.

I mean this isn't the fanciest way to do it, but it's the easiest. My mother would cringe because she is a pro, but to me it looks just fine! Love you, Mom! :)

I'm sure there are other tutorials out there, but I promised this one so there it is.

Disclaimer: If you hurt yourself, I take no responsibility. Reupholster at your own risk. 

Good Luck!


3.12.2012

ON MY MIND MONDAY: Navy Rooms

Lately I haven't been able to stop ogling these colors. I love the navy blue and crisp white with pops of color like these photos below. 

I also love the geranium pink side table! How adorable. (( I sense a DIY project to come...))

Can't tell if this is dark navy or black but the effect is what I'm loving right now. Especially with the pink lacquered boxed. 
Lastly, this faux Chevron print navy blue rug with the stacked orange Hermes boxes are gorgeous... (Although, I would prefer a continuous chevron print personally) ... Le sigh.


Here's to an inspired and energetic Tuesday!

01 09 10