Showing posts with label Thirft. Show all posts

7.04.2012

Salute Your Shorts! DIY American Flag Shorts

Happy Fourth of July! 


I know it might be a little late for you to make them to wear tonight, but I have a feeling that these shorts aren't just for the 4th of July. The Americana trend is hot right now, and so I decided to jump on the bandwagon make my own DIY flag shorts. ha. 

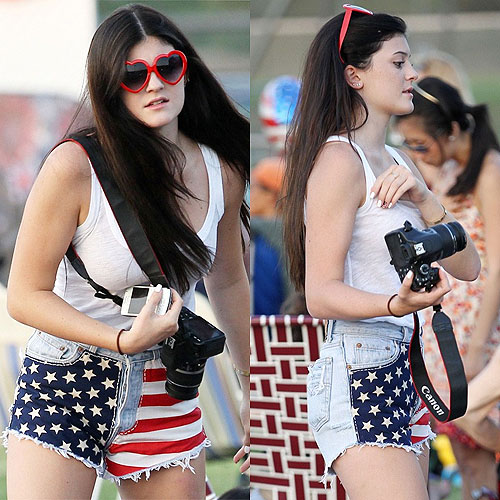
I was inspired by the ones Kylie Jenner is wearing in the picture above, and I believe they are by Runwaydreamz... here's a better picture. 


You will need:


1. Shorts: Got mine at Goodwill for dirt cheap. Less than 3 bucks. Can't beat that. 
2. Star stickers: Michaels had a sale on stickers right now. random. 
3. Fabric paint: also at Michaels, they were a dollar and change each. 
4. Scissors
5. Brushes. Hard Bistle and an fine angled brush. 
Paper plate to put your paint and a towel for the floor. 

Remember that your working with fabric paint and it won't come out of clothes, so wear something you craft/paint in. 

Ok. So this is what I did in a nutshell.


1.

Cut your shorts and wash them. 


2. 


Tape where you don't want the paint to be. 

3.


Lay tape for stripes down with 1'' tape on right side (left side when you're wearing them)

4. 


Measure and add stars to the left side. (right side when you're wearing them)

5. 


Apply blue paint. (I used metallic paints, and it looks awesome)

6.

Take out every other tape strip and add red paint and let it dry to the touch. 

7.


Once dry, remove the stars and switch the tape back on the red stripes to paint the white stripes. 

With an angled brush I filled in the stars on the blue side. 

Let the whole thing dry overnight. Read the instructions on the back of the paint for washing. Mine says 72 hours before I can wash them so that is what I am doing. 

In the morning you can remove all the other blue tape and reveal your new shnazzy pair of star spangled shorts! 


TA-DAH! 


Here is a picture I Instagramed earlier of me wearing them. (find me @DISCOairglow)


Hope you have a great holiday! 


Will you be trying out this trend?

Leave me a comment below! 

5.25.2012

DIY Snakeskin Tray


Solid Tray Instructions:
1. Wash and dry your fabric then iron it.
2. Mod Podge the side facing out to prevent fraying.
3. After it has dried for an hour, measure and cut your fabric to fit.
4. Make sure you center the pattern how you want it.
5. Apply Mod Podge to both the tray and the fabric and press it down firmly.
6. Smooth out all the air bubbles. Here is where the rewards card it handy.
7. Once the top had dried completely, flip it over and do the same for the back.
8. Cut the corners at an angle.
9. Apply Mod Podge all over the edges and corners to seal everything.
10. Let it dry overnight.
11. Optional: If you feel they tray is too sticky, spray it with clear acrylic spray.
Clear Plate/Tray Instructions: 
1. Flip your tray over onto a bowl to keep it from touching the table.
2. Apply Mod Podge to the back of the tray and to the side you want to show through.  (This is very important, or you will end up seeing the back of the fabric.) 
3. Lay it on the tray and smooth out the air bubbles with your fingers and the rewards card.
4. After it has dried, cut the edges.
5. Finish by applying Mod Podge to the back of the tray for any stray edges and for durability.
6. Optional: Again, you can use clear acrylic spray if your tray is too sticky.


THE BACKSTORY:

So, lately snakeskin trays have been all over the blogosphere and all in my brain. I am officially obsessed with them and I needed one like, yesterday.
Here are a few pictures to get you in the mood. *Cue Marvin Gaye and scroll slowly*
Sexy right? Oh man.
Unfortunately, when I went on the quest to find one like them, all were out of budget and back ordered to boot. womp womp.
 
Here are the ones I found:
$87.50 at Multichic.com
This one is by Two's Company and is a set of 3 for $92.99
Totally UH-mazing.
Needless to say the cheapest one I found was this one for $40-$55 at jaysonhomeandgarden.com... and they were out of stock, too. Awesome.
On to plan B. Make one!
I gave myself a budget of $25 and I came in under budget.
Materials:
Mod Podge: $6.49 (had a 40% off coupon): $4.19
Fabric: $10 + $4.90s&h
Tray: Had one, but the clear plate was $3 at Walmart
Foam brushes:  $0.50/ pop, Home Depot
Old Rewards Card: Free anywhere.
(I finally got some use out of my Costco card)
Total: $23.09 for 2
The tray I used was originally purchased at Walmart for like $8 or $9, but you can pick one up at a thrift store for much less.
I found a few different fabrics that I liked
This white one from Decorative Fabrics Direct was a close match but was $19.95/ yard, which was on special from $31.45.
 
This darker one I found on Fabric.com and was $7.98, but was a little too dark for my taste.
... And lastly I found the Goldy Locks of fabrics on eBay from a seller called The Sew Shop for just $10!
 
 
What do you think?  Would you make your own snakeskin tray?

5.17.2012

Furniture Retake: Coral and Mint Green Ombré Chairs

About a month ago I found these poor unfortunate chairs at my favorite local thrift store. They were having a 50% off tag sale and at $2.50 a pop I couldn't pass them up. 

This is what they looked like when I first got them home, x 2.


Sad, I know. 

Whilst on Pinterest I came across this image:


I love the black and yellow combination! Cute, but when I received the yellow chevron fabric that I ordered here, not so much. womp womp.


So I scratched that.

 A walk around Jo-Ann's and I found this beaut, which got me thinking magical thoughts of mint green and coral.


 It went something like this:

via
 via


 via


BOOM!


And that's how these were born.


Mint green, coral AND OMBRÉ? Yep. I did it.


I know they aren't technically patio chairs, but I put outside fabric on the seats in case I felt they would better suit the patio. ( Which I do! )

If you want to know how I reupholstered the seats, keep scrolling as I posted that info in my last post.

So, will you try Ombré on your patio? I think it looks très cool.


M

5.03.2012

Looky What I Found on Craigslist!

If you follow me on Twitter (@DISCOairglow) you might already know. 

While obsessively checking Craigslist, I found these wooden (not laminate) bookshelves for pennies on the dollar. 
They need some loving but I am super excited to revamp these babies. 


Before and After to come!

4.28.2012

Treasure Hunts: Chinoisorie

There are good days and there are bad days.... and yesterday was GLORIOUS. Unfortunately I woke up at 4 am, but on the plus side it helped me catch up on some blog reading, Craigslist hunting and eventually thrift store hopping. Currently I've been lusting after Chinese Chippendale and oriental influenced furniture; so chinoiserie chic.


I love the interesting geometric lines the bamboo creates and all the fun colors are so cheery, too! Swoon... 

 And how awesome are these vintage oriental headboards?!


Metallic!


Right?!


Anyhow, you can imagine how loudly I gasped when, in the free section of Craigslist, I found this gorgeous girl!!
***Please excuse the ugly renters nightmare background, as it has yet to be tackled in the three weeks I have been here. ***


DID I MENTION IT WAS FREE!!?? 

Granted it has to be minimally repaired but my heart still skipped a beat when I saw it. IT HAD TO BE MINE! But my grandmother always said, "What belongs to Caesar, belongs to Caesar," (it was said in Spanish and sounds different, but you get the point) and thus I impatiently waited an agonizing 4 hours for an email back with an address saying that she was going to put it outside and to call her when I was on my way so she could tell me if it was still there. Needless to say, I jumped in the car and got there before she had even taken it out of the house. SUCCESS!
 Once I get the one project in front of this one finished, I'll be "allowed" to start a new one. ((Squeal!))


... Also in my day of being a wild lioness of all things bargain, I thrifted this pretty planter/pot


an Elephant Pedestal side table


 a much needed table that reminds me of one I saw at CB2 and Ikea, this one needs some TLC but it was only 15 bucks. 


Inspired by:


and an also much needed dresser with brass hardware and mirror. (Did I mention I just moved out of state with no furniture?) 


All for $120!


I'm undecided on the mirror but I definitely want to paint this bad boy... I really wanted a campaign dresser but until the day I find one, this beauty will have to satisfy my brass hardware fix. Now my dilemma lies in choosing a color. 

White?


Kelly Green? 


or  Peacock Blue? 


If anyone is reading this, let me know what you think!  
01 09 10