
Showing posts with label SUMMER. Show all posts
Showing posts with label SUMMER. Show all posts
8.23.2013
Mila Kunis Inspired Metallic Smoky Eye // Wet n Wild Color Icon Comfort Zone Palette
In honor of my new found #newness, I decided to film a Get Ready With Me // Flash Tutorial video of a Mila Kunis inspired metallic smoky eye I wore last night. I've never filmed myself doing my makeup before and I can tell you it was definitely quite the juggling experience. It's funny how even my makeup had become ritualistic.
I decided to step out of my own comfort zone with my new Wet 'n Wild Color Icon Comfort Zone 738 palette that I picked up on Monday night: super spur of the moment purchase but around the $5 mark and the shadows are pretty pigmented for the price. It's an all around winner. The only negative about this palette is that the packaging was so difficult to pry open, I actually thought I was going to break the plastic cover and/or a nail. The shadows stayed on all night and fall out was minimal so I'm fine with the packaging being slightly faulty. What do you expect for five bucks?
8.10.2013
Thrifty
Just a few things I've accumulated from all the obsessive thrifting I've been doing. Let me know in the comments below if you'd like more videos.
5.21.2013


7.07.2012
DIY: DIP DYE DENIM
Lately the bleached demin look has been super chic and I was eagar to try it myself.
My inspiration:


My hopes for the pink pair...

Over at my favorite thrift store I got super lucky and found a pair of dark wash Levi's, vintage Jordache and a pink pair of vintage Bongo jeans with botton clousures all with so much potential.

What you need:

Bleach
Gloves
Bucket
Distilled white vinegar (to stop the bleaching process when I get my desired look)
Tongs, just in case.
1. Cut your shorts

2. I filled the bucket with two parts water, one part bleach. I also used hot water and realized it takes much less time to process.

3. Dip your shorts in to about an inch lower than you want the bleach to start. (it will run up a little)
I put mine on a hanger and hung them over the bucket.

3. Dip your shorts in to about an inch lower than you want the bleach to start. (it will run up a little)
I put mine on a hanger and hung them over the bucket.
4. Check ever 10 minutes, mine took 30 minutes to process.

5. place them in a tub with water and vinegar (2:1 ratio), rinse them well and place them in the washer and dryer by themselves the first time. Then you can wash them with other clothes.

5. place them in a tub with water and vinegar (2:1 ratio), rinse them well and place them in the washer and dryer by themselves the first time. Then you can wash them with other clothes.
6. Wear them and be awesome.
Here are a few pictures I instragramed of me wearing them. (Follow me @DISCOairglow)


I didn't dip dye the lighter wash Jordache and they came out super cute as well! I just wanted a pair of plain distressed cut offs.
More pictures to come of the other two jeans in another post! ;)
More pictures to come of the other two jeans in another post! ;)
What do you think?
7.04.2012
Salute Your Shorts! DIY American Flag Shorts
Happy Fourth of July!

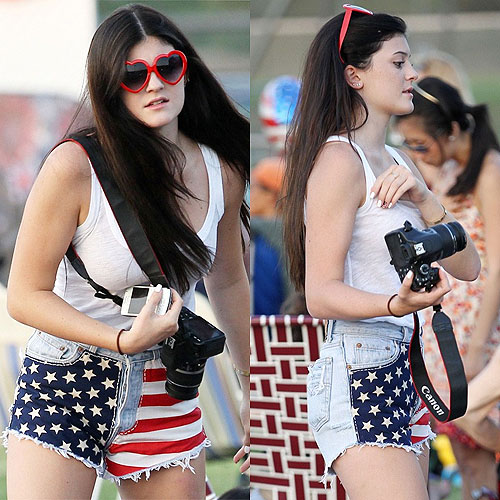

I know it might be a little late for you to make them to wear tonight, but I have a feeling that these shorts aren't just for the 4th of July. The Americana trend is hot right now, and so I decided to jump on the bandwagon make my own DIY flag shorts. ha.
I was inspired by the ones Kylie Jenner is wearing in the picture above, and I believe they are by Runwaydreamz... here's a better picture.


You will need:

1. Shorts: Got mine at Goodwill for dirt cheap. Less than 3 bucks. Can't beat that.
2. Star stickers: Michaels had a sale on stickers right now. random.
3. Fabric paint: also at Michaels, they were a dollar and change each.
4. Scissors
5. Brushes. Hard Bistle and an fine angled brush.
Paper plate to put your paint and a towel for the floor.
Remember that your working with fabric paint and it won't come out of clothes, so wear something you craft/paint in.
Ok. So this is what I did in a nutshell.
1.

Cut your shorts and wash them.
2.

Tape where you don't want the paint to be.
3.

Lay tape for stripes down with 1'' tape on right side (left side when you're wearing them)
4.

Measure and add stars to the left side. (right side when you're wearing them)
5.

Apply blue paint. (I used metallic paints, and it looks awesome)
6.

Take out every other tape strip and add red paint and let it dry to the touch.
7.

Once dry, remove the stars and switch the tape back on the red stripes to paint the white stripes.
With an angled brush I filled in the stars on the blue side.
Let the whole thing dry overnight. Read the instructions on the back of the paint for washing. Mine says 72 hours before I can wash them so that is what I am doing.
In the morning you can remove all the other blue tape and reveal your new shnazzy pair of star spangled shorts!

TA-DAH!
Here is a picture I Instagramed earlier of me wearing them. (find me @DISCOairglow)

Hope you have a great holiday!
Will you be trying out this trend?
Leave me a comment below!
6.02.2012
Weekend Recap.
Here are some pictures of today's beach trip. Yay!


self portrait,

and your standard nimbus cloud, of course.
ehem..
get your mind out of the gutter.
Hope you all had a great Saturday as well!
Subscribe to:
Posts (Atom)